Cheap Arduino mesh using RF24 radio modules

Communication between devices is key when you want to combine one or more devices. In my previous blog, I used I2C, Bluetooth and RF24 modules. The latter ones, the RF24 have a few advantages: they are cheap and do not need pairing. In my previous blog, I used them for a peer-to-peer (or better: Master-Slave) communication. This time, we will look at a mesh network using these devices.

Doorgaan met het lezen van “Cheap Arduino mesh using RF24 radio modules”

Control your Arduino Rover using Firmata and Xbox One Controller

A few month ago I bought a little rover (controlled by an Arduino Uno) for a very good price. The kit was very complete: Car chassis, 2 Car Wheels, 2 DC Gear Motors, a UNO R3, an L298N Dual H-Bridge Motor Controller and several other components.

This rover is meant to be programmed for autonomous operation. Hence an ultrasonic sensor and a servo is also added in the kit. Also a nice Arduino sensor shield 5 is in the kit. Yes, it was a real bargain 😉

But my idea was to use both an Xbox One Controller and the Firmata protocol to drive this one by myself or one of my sons. And it works very well!

Here is a video of the final solution:

In this blog, I will show you how it’s done.

Doorgaan met het lezen van “Control your Arduino Rover using Firmata and Xbox One Controller”

Using your Xbox One controller in a UWP app

One of my original Xbox One controllers became useless a few weeks ago. It started to ‘walk away’ with my left stick. Whenever I released my thumb, it still generated a forward motion, not very handy if you are in the middle of a battlefield…

So I ordered a new one from the Microsoft Store but being a geek, I bought one with the Wireless Adapter for Windows.

02 adapter

This adapter makes it possible to use it on a Windows 10 device, like my laptop.

Doorgaan met het lezen van “Using your Xbox One controller in a UWP app”

Better long running custom Firmata functions

If you managed to get to this part, you have seen how simple wired communication protocol between two Arduino’s is transformed into communication over Bluetooth using the Firmata protocol. Great!

Now we take a look, again, at a demo given at the Ignite 2015 in Australia. In this demo, an ultrasonic distance reader is used to generate a custom stream of measurement.

Although it’s a demo and it serves a purpose, the solution shown has an architectural flaw. If we look deeper into the Arduino code, we will find a ‘while (true) {}’. It is put inside a switch inside the ‘custom function handler’ sysexCallback().

Yes, this generates a constant stream of measurement but it also locks up the Firmata on the Arduino. No other call will de handle anymore because the endless loop is just blocking further communication.

Doorgaan met het lezen van “Better long running custom Firmata functions”

Using a GPS receiver for Arduino

A few days ago I bought this GPS receiver component from the internet It only costs less than 10 dollars, a fair price. Note: There are also components of five dollars or less. Check them out below.

gps01

The number on the module was xm37-1612 and it is a rather common GPS module, even used in drones.

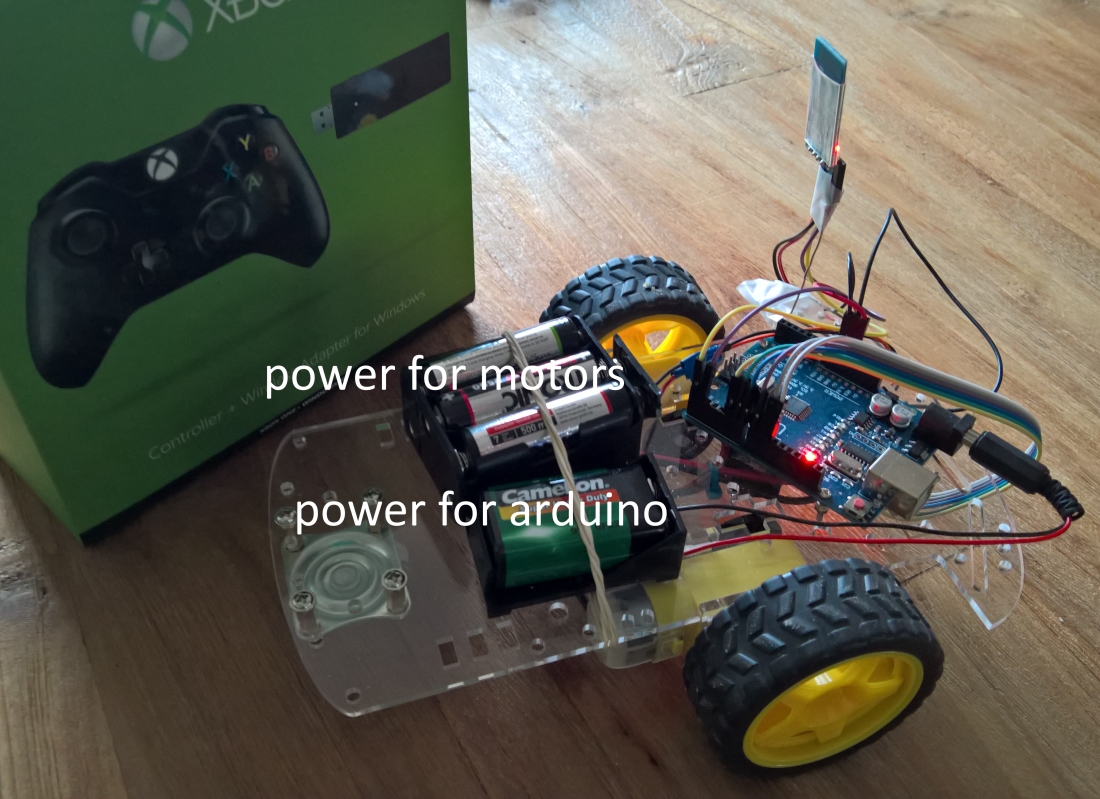
This module needs 4 pins: ground, power (3.3V or 5V), TX and RX. So it communicates using a serial port.

So just solder the pins on the module. Keep the big ceramic antenna on top, and pins downs. I soldered the pins up too so it’s not possible to put in on a breadboard 😦

Then connect the module to the Arduino using power and ground and the RX-TX. For now use port 0 and 1 (on an Arduino Nano), RX on RX, TX on TX (which is strange, normally they have to be crossed… Maybe it’s just this type which is behaving strangely).

Now connect the Arduino to a laptop using the USB cable. It is really easy to test the module!

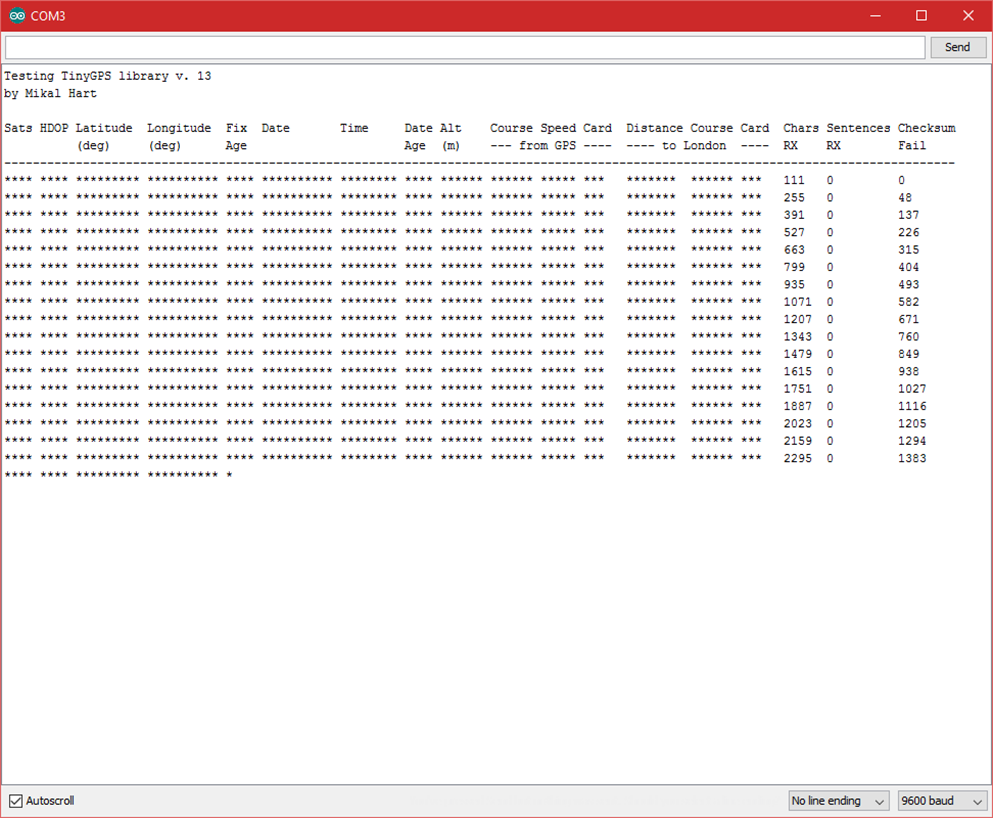
This is how… Just open up the Arduino Sketch IDE and select the right board (I use a Nano) and select the right Com-port for the USB (I use port 3). And the open up the serial (port) monitor. Select a communication speed of 9600 baud, the speed the module uses. If just needed to upload an empty project.

And there you have it, raw GPS information coming from your GPS module.

gps02

Note: this trick works for my Nano. My Leonardo is not showing anything… (Update: this is due to the differences in the design of the board. Pro tip: if you want to use other pins, check out Software serial. But also check out the board limitations, such as the Arduino design. I use port 8 and 9 for RX/TX on the Arduino)

As you can see, the messages are shown in plain text. And for the trained eye, it even makes sense 🙂 (Just like a scene from The Matrix).

The GPS gives a lot of information: your position, the position of the satellites in sight, your speed, your heading, your elevation (but pretty poor), UTC time and the quality of the measurement.

The quality is called DOP, dilution of precision and it is an indication of the accuracy of the fix. It ranged from 1 to 50 but a DOP less the 10 is considered poor.

Btw. A GPS also receives information from the satellites which is not passed to the user. I am talking about trajectory and frequency information. Most GPS satellites are not geostationary and once in a while their trajectory is changed to avoid collisions with other space debris (or the IIS or Martians). And every satellite communicates in a different way/frequency. This information is put into a table and has to be updated frequently so the GPS ‘knows when to listen and where’. Otherwise, it loses the ability to receive the right information.

High-level GPS devices (like a TomTom or Garmin) have the ability to upload the table from the internet (using some software tool provided by the company). But low-level modules have to receive it from the known satellites. This can take up to a couple of hours. So collect all your GPS devices you keep at home or in your car and let them run for a couple of hours.

So what do these lines of characters mean?

Each line is a certain sentence with specific information. Some sentences give the same information but overall they have their own usage.

For example, let’s look at:

$GPGGA,123519,4807.038,N,01131.000,E,1,08,0.9,545.4,M,46.9,M,,*47

The $GPGGA means that this sentence contains the essential GPS information. The *47 is just a checksum of this line. If the checksum of the line does not match *47, just ignore this sentence. Serial communication is easily corrupted but you will get a new sentence in just a fraction of a second.

The information in the sentence is separated by commas and each value represents some vital information. Eg. 123519 is a Fix taken at 12:35:19 UTC (It is always today). 4807.038,N  means Latitude 48 deg 07.038 seconds North and 01131.000,E  means Longitude 11 deg 31.000 seconds East.

More detailed information is available at http://www.gpsinformation.org/dale/nmea.htm

Looking at this complex data, do you still want to know your position? 🙂 In 2005 I already parsed these sentences and it is very intensive. And that was written in C#, we are using an Arduino with another language now…

Do not worry, we do not have to parse the data on our own. Now TinyGps comes to the rescue. There are two version a default one and a newer TinyGPS++. Both are working for our module.

So download the software library and import it into the Arduino Sketch IDE. And let’s start using the test_with_gps_device example (or ‘fullexample’ if you use TinyGps++).

As you can see in the code of the example, you are able to adjust the baud rate in the code, the RX Port and the TX Port.

But because you are working using an actual device, please now attach RX to TX and visa-versa.

Now there is a catch! In my innocence, I adjusted the code so I used port 1 and port 0 (although the code was referring to port D4 and port D3). So it was not working… See how the checksum is failing…

gps04

In other examples, I made the same mistake. It just gave a lot of corrupted characters. What was I doing wrong besides being stubborn?

Well as we have seen in the previous communication, the RX-TX line is used by the USB to fill the serial monitor. So the RX-TX is already in use! But officially this is the only possibility for serial communication.

Therefore, the example uses SoftwareSerial. This library simulates serial communication on other ports. So do not ignore port 4 and 3 🙂

gps03

If you experience lines full of stars but the checksum is zero, the communication could be ok… Please check RX is connected to TX etc.

So now you have some basic knowledge about both the working of GPS in general and specific knowledge about accessing your GPS module using TinyGps.

Update for Neo-6m-GPS module

Today I tested another GPS module, a Neo 6M module. It only costs $3.75, including shipping, so it was worth a trial.

gps

The module at the top of this web page, pushes it’s NMEA messages over the RX/TX lines. So I just attach an Arduino Nano with an empty sketch and the raw GPS info appears in the debug window.

This Neo 6M module gave nothing…

untill, finally, I got the right information using the TinyGPS-13 library. Look in the Arduino IDE at the “simple GPS sketch”. Just connect:

  • 5V to VCC and ground to GND.
  • TX with port 4
  • RX with port 3

Port PPS can be ignored (this is used for time/clock functionality).

And with that sketch, GPS info will arrive (in-house I connected to 7 satellites now). A led on the GPS module shows when data arrives at the module.

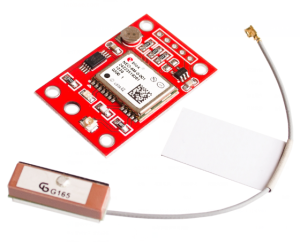
On the web page of the seller, a warning is given that the chip is old. But my GPS module gave good reception and accurate location. So, for less the four dollars I can recommend this GPS module. The module has a separate ceramic antenna (attached by a wire which contains some sticker (better leave it on, could be some interference filter)). This makes the module a bit fragile but also mode flexible to place in a casing.

Grove GPS Module

If you are not into GPIO but more into Grove base connectors, try out the Grove GPS Module. I have several sensors supporting the Grove connector and it is really simple to make a solution without any soldering. It’s ideal for setting up a quick test solution.

This GPS from Seeed Studio also has this serial interface for the NMEA protocol.

Sponsored message: Seeed Studio is the IoT hardware enabler providing services over 10 years that empower makers to realize their projects and products. Seeed offers a wide array of hardware platforms and sensor modules ready to be integrated with existing IoT platforms and one-stop PCB manufacturing and Prototype PCB Assembly. Seeed Studio provides a wide selection of electronic parts including Arduino, Raspberry Pi and many different development board platforms. Especially the Grove Sytsem help engineers and makers to avoid jumper wires problems. Seeed Studio has developed more than 280 Grove modules covering a wide range of applications that can fulfill a variety of needs.

Getting IP-Address in Win 10 IoT Core

I was working on a new pet project for Windows 10 IoT Core.

At this moment Win10 IoT Core is not supporting the Wi-pi Wi-Fi dongle. So I am using a Dlink 505 mobile companion to attach my Raspberry Pi b2 to my local network. This works great although Visual Studio has some trouble detecting the device.

But because the default app (yes, this is just an app) on the Pi shows the current IP-address, I can simply submit that address when deploying (in the project settings).

pack1

So far so good.

But when I deployed my own app I ran into a little problem. My Pi gets the current IP-address dynamically so at one point my deployment was not working anymore. The device had a new IP-address….

And this address is also needed for RDP so it is rather important.

I wanted to read the current IP address in C# code so I could show it in my own app. This seems a bit trivial, but Google was not helping me this time. All examples were based on System.Net so that was not working.

Then I was thinking, could it be that the default app is just open sourced? That way I could look in the code MSFT provided.

And yes it is! Just go to the github location.

And there I found the code to read the IP4 address (now a bit modified):

public static string GetCurrentIpv4Address()
{
  var icp = NetworkInformation.GetInternetConnectionProfile();
  if (icp != null
        && icp.NetworkAdapter != null
        && icp.NetworkAdapter.NetworkAdapterId != null)
  {
    var name = icp.ProfileName;

    var hostnames = NetworkInformation.GetHostNames();

    foreach (var hn in hostnames)
    {
      if (hn.IPInformation != null
          && hn.IPInformation.NetworkAdapter != null
          && hn.IPInformation.NetworkAdapter.NetworkAdapterId
                                                     != null
          && hn.IPInformation.NetworkAdapter.NetworkAdapterId
                      == icp.NetworkAdapter.NetworkAdapterId
          && hn.Type == HostNameType.Ipv4)
      {
        return hn.CanonicalName;
      }
    }
  }

  return "---";
}

Resolve the namespaces if needed…

So thank you MSFT for making the code available.

Dvlup.com is now part of MSDN network

Almost two years ago, I joined http://www.dvlup.com. I was exploring and building Windows Phone apps and Nokia had this really exciting program. What’s better then building apps? Building apps and getting free stuff for them!

A few months ago, Microsoft has rebranded dvlup.com to MSDN Rewards. So join it for free.

The program is very easy: just finish some challenges and earn points. And with these point, go shopping in the rewards shop.

The challenges are very streight-forward; Earn XP and/or point by building apps with special features, do a quiz for a special subject, attend a (online) event or update a app.

Last month DVLUP introduced me into machine learning using Azure, programming the Microsoft Band and the Edge browser. And I have my app tested by others using http://www.wpbeta.me.

I really like dvlup.com as a gamification concept. As the slogan says: “Have fun. Earn rewards. Build new ideas” it connects you to new technology, new tooling and other part of MSDN you normally do not encounter.

The only drawback for me is that it is not possible anymore to earn hardware in The Netherlands. Pitty because with Windows 10 just around the corner and having earned enough points for a simple device, it would be nice to buy a nice tablet or phone in the Microsoft Store. But maybe this will change in the near future.

So if you are interested in Microsoft technology and earn some software tooling, hardware (in some area’s) or gift cards, just join dvlup.com.

See how I am doing at https://rewards.msdn.microsoft.com/svelde


Bijeenkomst: Windows Phone Developer Day 2013

Vandaag, 5 oktober 2013, is er een bijeenkomst genaamd Windows Phone Developer Day georganiseerd door een aantal Windows Phone MVP’s. Dit evenement is een beetje uit de hand gelopen; wat begon als een onderonsje in enkele landen, is uitgelopen tot een waar continentale happening.

Ik zal vandaag live een blog proberen bij te houden. Excuses voor spelfouten etc.

Dit evenement is bij Macaw op Schiphol-rijk georganiseerd. Een eindje rijden dus maar ik heb er zin in op mijn vrije zaterdag.

De agenda is:

09:30 opening (Joost van Schaik + Dennis Vroegop, welkomstwoord)

09:45 sessie Tom Verhoeff (‘3 ways to get started’)

11:00 Fons Sonnemans (‘Designing Windows Phone apps UI using Blend’)

12:15 lunch

12:45 sessie Roy Janssen (Mobile Services in combinatie met Windows (Phone) 8 applicaties)

14:00 sessie Vincent Hoogendoorn (Creating Viewmodels with MvvmQuickCross)

15:15 sessie Mark Monster ( The journey to a podcast app for Windows Phone 8)

16:30 afsluiting met kort sessie van Paul Mols, verloten 920 en 820

17:00 done

Een gevulde agenda dus.

We zijn begonnen. Eerst komt er een welkom en bedankje voor Macaw want die hebben de locatie beschikbaar gesteld. Er zijn vandaag 6 events wereldwijd, in totaal doen 22 landen mee, deze weken.

Wp7.nl en dotNed.nl hebben geholpen en ook Nokia en Microsoft doen lekker mee.

Naast sessies zijn beneden ook mogelijkheden om te knutselen en om samen te overleggen als je ontwikkelen wilt…

Er zijn ook nog wat prijsjes en ieder aanwezige krijgt een jaar gratis publiceren cadeau.

Er zijn ook aanwezigen zonder ontwikkelervaring. Dus eerst worden er een aantal demonstraties gegeven (met oa. open data) en ook ontwikkelen via de app store development website zal getoond worden.

In de eerste demonstratie wordt een koppeling naar het Nationaal Geo Register getoond. De binnenkomende json wordt getoond op het scherm via een kaartje. Het is een uitgewerkte versie van een blog van LocalJoost. Er wordt hierbij een Map component van een Layer met huisjes voorzien. Helaas ging de demo hier te snel, niet duidelijk werd hoe de plaatjes via een coordinaat geplaatst werden. De entiteit achter een adres leek geen lat/lon te bezitten…

Zo werden ook maximum snelheden op wegen via kleurtjes getoond. Er werd een layer met lijntjes getoond.

Zeer interessant. Gelukkig zwerven hier usb sticks met de code rond 😉

De Windows Phone App Studio website demo was ook interessant.

In slechts enkele minuten werd getoon hoe een panorama scherm gevuld werd met een RSS feed (met een detail scherm achter de items) en een YouTube channel. Ook werd een lijst van statische informatie via een CSV bestand ingeladen (die vooraf geexporteerd was).

Naderhand is de code gedemonstreerd die gegenereerd is door de website. Mooi, we kunnen dus zelf de app uitbreiden en het is al helemaal in MVVM stijl opgebouwd (MVVM light toolkit-achtige code) dus zeer herkenbaar. Alleen de datasource injectie is iets waar ikzelf nog eens in moet duiken.

Mooi is te zien dat dit ook Unity gebruikt voor dependency injecten.

Dit was een demo die de aandacht van het publiek kreeg.

Ik vind het wel jammer dat deze solution een andere opzet heeft dan de template die ik normaal gebruik. Hierdoor blijft uitlevering naar WP7.x toestellen achtergeweg, geen idee waarom. De spreker adviseerde ook om volledig voor wp8 te gaan. Ook dit vind ik onterecht. De beschikbare wp7/wp8 template werkt prima en is een goede investering, ook in de toekomst. De WP7.x projecten kunnen zo veel later uitgefaseerd worden.

Laat Microsoft deze twee templates combineren: de injectie van de een en de multi app ondersteuning van de ander!

Tussendoor heb ik een workshop gevolgd en heb ik mijn Windows Store developers account voorzien van de juiste gegevens voor het ontvangen van vergoedingen voor advertenties. Nu kan ik ook mijn gebruikers lastig vallen met reclame danwel het kopen van een reclamevrije versie.

Daarna was de lunch. Een feestmaal en goed voor het netwerken. Een leuke gelegenheid om oude collega’s te ontmoeten.

Vervolgens kregen we een presentatie over het toepassen van Azure Mobile services voor Windows Phone. Dit is een fraaie uitbreiding op Windows Phone apps ontwikkelen. In slechts enkele minuten werd gedemonstreerd hoe data naar een app werd gepushed via het Push Notification model van Azure Mobile Services. Een Pushchannel aanvragen is heel eenvoudig en de vulling van nog niet gelezen berichten is opgelost met een aparte tabel. De inhoud is hierbij ook te veranderen.

Het toepassen van AMS is overigens beperkt tot maximaal vijfhonderd toestellen. Geen idee of dit concurrent is…

Ook het opslaan van data is erg eenvoudig. Je kunt op AMS gewoon losse tabellen definiëren en deze zijn restful beschikbaar over het internet. Dit betekent dus Create, Read, Update en Delete.

Super eenvoudig allemaal. Ik heb alleen geen idee wat dit per maand gaat kosten als je wat load krijgt. Microsoft biedt een trial versie van Azure voor beginnende ontwikkelaars. Diegene met een MSDN account kunnen zelfs maandelijks gratis gebruik maken van Azure (tot wel 150 euro pr maand). Gelukkig heeft Microsoft een limiet ingesteld dat bij overschreiding het account gewoon tijdelijk geblokkeerd raakt. Er gaat niet opeens een teller op je creditcard lopen.

Pushnotificaties zijn erg prettig om je gebruikers gebonden te laten blijven aan je applicatie.

Er is ook getoond hoe de AMS scheduler toegepast kan worden. Denk hierbij aan een stukje code die op gezette tijden op de Server uitgevoerd wordt. Overigens zijn de scripts op de server allemaal in JavaScript geschreven. Want AMS is gebaseerd op NodeJS. Hopelijk kan op die manier ook onderhoud op de server gepleegd worden (denk hierbij aan het verwijderen van verouderde data) want Azure is niet echt gratis indien je dit professioneel wilt toepassen.

In VS2013 is er nu een gave integratie (add connected services) om direct je scripts met intellisense te onderhouden: lezen en schrijven. Voorheen (nu) moet dit nog in de browser onderhouden worden.

De presentatie rond MvvmQuickCross vond ik zelf veelbelovend. De spreker was met Xamarin cross platform bezig. Maar deze presentatie ging dus over de een lichte variant van MvvmCross. Dit is de quick versie om een aantal standaard taken te vereenvoudigen.

MQS maakt het mogelijk om uit MVVM het model en ViewModel als generiek voor meerdere platformen (Windows, IOS, Android) te beschouwen zodat alleen nog de views, navigatie en app nog per platform gedefinieerd moeten worden.

Als ik het zo zie, zou Microsoft eigenlijk dit framework moeten gebruiken als pattern implementatie voor de gegenereerde code uit de Windows App Studio website. Gemiste kans.

Maar tot zo ver lijkt het allemaal op een willekeurige Mvvm bibliotheek.

De generatie van viewmodellen is wel afwijkend opgelost en kan tijd besparen. De binding notificatie wordt namelijk via code snippets toegevoegd. Dit scheelt wat loodgieteren. Ook voor commando’s is een versnelling aanwezig in de code snippets.

Wel is de navigatie tussen views standaard ondersteund door een Inavigator implementatie. Hierbij maak je alle navigatie mogelijkheden beschikbaar op de navigator. En deze worden aangeroepen door de ene view om naar de volgende te gaan. Persoonlijk zou ik dit juist via commands laten lopen. Ik vind dat views geen of zeer beperkt kennis moet hebben over andere views. Uiteindelijk werd ook zoiets ook wel getoond maar je kunt de navigatie beter als een soort workflow beschouwen: afhankelijk van de verzamelde informatie en de view waar je vandaan komt, moet de volgende view vastgesteld worden. De view zelf is niet in de positie om dit te kunnen.

Als laatste Windows Phone presentatie kwam van Mark Monster. Hij is bekend van oa. De fokke en sukke app, buienradar, centralpoint, iBood en de WP unified adrotator.

Hij wilde een Podcast app en heeft hier veel van geleerd.

Podcasts zijn groot en downloaden kost veel tijd. Downloaden kan met periodiek apps en met een een resource intensieve task. Mark vertelt over een heleboel afhankelijkheden waar je rekening mee moet houden.

Ook de linq to xml of xmldocument zijn onhandig in een achtergrondtaak. De XmlReader biedt uitkomst.

Background transfers zijn de uitkomst bij downloaden. Hij pauzeert en schakelt over op Wi-Fi etc. Aantal downloads is wel gelimiteerd (haal ze er op tijd uit). Ook kunnen er maar twee tegelijkertijd lopen. De grootte is gelimiteerd afhankelijk aan stroomgebruik en Wi-Fi aanwezigheid.

Langzame overdracht worden gepauzeerd.

Controleer de Windows Phone Toolkit want die levert ondersteuning voor de queue achter de downloads.

Over audio afspelen was ook wat te vertellen. Gebruik de background audioplayer. Die werkt ook over Bluetooth en pauzeert ook (net als vooruit/achteruit) (F9/F10 in emulator voor de universele bijbehorende afstandsbediening)

Debuggen geeft ander gedrag dan tijdens runtime (niet helemaal duidelijk hoe…) Tijdens attachen van debugger moet je de backgroundaudioplayer.instance.close() uitvoeren. Dit voorkomt nare problemen zoals alles opnieuw opstarten omdat de debugger crasht. Kijk ook naar de lifecycle van dat ding.

Mark heeft ook nog fix voor een FM radio die dwars door de background player wordt gedraaid. Sluit even de radio af. (lumia gdr2 only)

De integratie met de music en video hub kwam ook even in aan bod. Leuk dat je bv. kunt zien wat momenteel gespeeld wordt.

App Analytics kwam ook aan bod. Dit ga ik zeker toepassen. Ik wil wel weten in welke taal ik mijn app gedraaid wordt. Dan kan ik deze gaan vertalen voor mijn markten. Gebruik de GoogleAnalyticsSDK Nuget package.

Laat je eigen app ook controleren op updates. Joost van Schaik heeft hier een zero lines of code behavior voor. Fraai!

En dat was het voor vandaag. Excuses voor de spelfouten.

Uiteindelijk is deze dag weer geslaagd. Ik heb veel indrukken en kennis opgedaan. Ik zie dit graag volgend jaar herhaald worden.

3D illusie met XBox 360 Kinect

Het is al weer een enige tijd geleden dat Johnny Chung Lee  opzien baarde door met een eenvoudige Wii Remote hele leuke toepassingen wist te verzinnen die Nintendo nog niet verkocht.

Voor diegene die het gemist heeft, er staat een leuke demonstratie op het web van zijn TED presentatie. Hierin wordt oa. een 3D illusie geïllustreerd door met een bril te bewegen die via infrarood de positie van het hoofd verraden. En die positie wordt door de remote opgevangen via de interne camera. Meer informatie is ook te vinden op zijn website.

Toen Microsoft de eerste Kinect los verkocht werd deze met een adapter geleverd om op een reguliere USB poort aan te sluiten en al snel werd ook de Kinect ‘gehacked’. De opnames van de Kinect worden niet versleuteld dus al snel waren er open-source bibliotheken om de ruwe informatie uit Kinect te kunnen benutten voor de PC. Oa. mijn gewaardeerde collega Jan Saris heeft hier heel wat uurtjes aan gesleuteld met leuke projecten tot gevolg.

Ik heb destijds ook met verbazing gekeken. Ik vond vooral de ‘stadion’ illusie erg leuk. Sindsdien heb ik dit altijd nog eens over willen doen met de Kinect. Deze kan dus de positie van meerdere personen bepalen en dus ook van ook die van een hoofd. En je hoeft geen brilletje op te zetten.

Nu is dit al vaker gedaan :-). Zo is de  Kinect gecombineerd met 3D TV.

Wellicht was het geldingsdrang maar ook ik wilde dit nog eens uitzoeken. De afgelopen week heb ik er eindelijk vaart achter gezet en tada, hier is het resultaat.

Kinect SDK plus Kinect Toolkit

Om met de Kinect te kunnen knutselen moet je beschikken over Visual Studio en je hebt Kinect for Windows SDK v1.6 nodig. Volgens de EULA mag dit alleen i.c.m. de “Kinect for PC” (een duurder broertje met een verbeterd blikveld) toegepast worden. Het is niet toegestaan de Xbox360 Kinect te promoten bij je eigen software. Gelukkig  mag je wel testen met de Xbox360 Kinect en dat gaan we hier dus doen…

Ook is het handig om dan direct ook de Kinect for Windows Developer Toolkit v1.6 te downloaden. Dit is echt goud! Hierin zitten voorbeelden hoe je de Kinect kunt gebruiken voor spraak besturing (inclusief richtinggevoeligheid) of hoe je door een applicatie kunt navigeren met die typische Kinect handbesturing.

En natuurlijk zijn er in de Kinect ook voorbeelden van applicaties die skelet tracking uitvoeren, zoals de Skeletons basic –WPF app.

Deze laatste WPF applicatie gaan wij ombouwen.

Wat is het idee? Ik toon een mooi vergezicht overmaats op het scherm, dit geeft de illusie als dat je door een raam kijkt. Als je naar links loopt, dan gaat de foto ook naar links, en naar rechts als naar rechts loopt. Hierdoor is het net alsof je om de hoek kijkt van een raam. Of zo J. En dat kan herhaald worden door boven, onder, dichterbij en verder weg.

Absoluut werd relatief

Ik heb enkele manieren onderzocht en bleef een beetje steken in een ViewModel. Ik wilde graag MVVM toepassen. Nu kan ik de absolute posities achterhalen en die doorgeven naar de X, Y, Z en zoom factor maar dit wordt erg schokkerig. Ik kreeg het niet voor elkaar om een storyboard hier aan te koppelen. Een trigger gaat pas af als een bepaalde waarde gehaald is, niet als een waarde verandert?

Dus ik heb geen storyboard toegepast. Wel heb ik de positiedoorgifte van een gevoeligheid voorzien. Als een gemeten positie  flink afwijkt vanaf een vorige geaccepteerde positie dan wordt de foto verschoven en dan wordt dit de nieuwe te onthouden positie.

Daarom heb ik voor de verschillende richtingen in totaal zes storyboard gemaakt die vanuit de code behind worden aangeroepen. En ik heb een extra code-behind geschreven om de foto op de start positie te brengen.

De Xaml ziet er dan als volgt uit; zeven storyboard en een image op een grid:

<Window x:Class="MainWindow"
  xmlns="<a href="http://schemas.microsoft.com/winfx/2006/xaml/presentation">http://schemas.microsoft.com/winfx/2006/xaml/presentation</a>"
  xmlns:x="<a href="http://schemas.microsoft.com/winfx/2006/xaml">http://schemas.microsoft.com/winfx/2006/xaml</a>"
  Title="PictureZoom"
  Loaded="WindowLoaded"
  Closing="WindowClosing"
  WindowState="Maximized"
  WindowStyle="None"
  WindowStartupLocation="CenterScreen"
  mc:Ignorable="d"
  xmlns:d="<a href="http://schemas.microsoft.com/expression/blend/2008">http://schemas.microsoft.com/expression/blend/2008</a>"
  xmlns:mc="<a href="http://schemas.openxmlformats.org/markup-compatibility/2006">http://schemas.openxmlformats.org/markup-compatibility/2006</a>"
  d:DesignHeight="710"
  d:DesignWidth="1300"
  SizeToContent="WidthAndHeight">
<Window.Resources>
      <Storyboard x:Key="Start">
        <DoubleAnimation Storyboard.TargetName="Scale"
                         Storyboard.TargetProperty="(ScaleTransform.ScaleX)"
                         To="1.6"
                         Duration="0:0:0.0" />
        <DoubleAnimation Storyboard.TargetName="Scale"
                         Storyboard.TargetProperty="(ScaleTransform.ScaleY)"
                         To="1.6"
                         Duration="0:0:0.0" />
      </Storyboard>
      <Storyboard x:Key="ZoomIn">
        <DoubleAnimation Storyboard.TargetName="Scale"
                         Storyboard.TargetProperty="(ScaleTransform.ScaleX)"
                         By="0.010"
                         Duration="0:0:0.20" />
        <DoubleAnimation Storyboard.TargetName="Scale"
                         Storyboard.TargetProperty="(ScaleTransform.ScaleY)"
                         By="0.010"
                         Duration="0:0:0.20">
          <DoubleAnimation.EasingFunction>
            <SineEase EasingMode="EaseInOut" />
          </DoubleAnimation.EasingFunction>
        </DoubleAnimation>
      </Storyboard>
      <Storyboard x:Key="ZoomOut">
        <DoubleAnimation Storyboard.TargetName="Scale"
                         Storyboard.TargetProperty="(ScaleTransform.ScaleX)"
                         By="-0.010"
                         Duration="0:0:0.25" />
        <DoubleAnimation Storyboard.TargetName="Scale"
                         Storyboard.TargetProperty="(ScaleTransform.ScaleY)"
                         By="-0.010"
                         Duration="0:0:0.25">
          <DoubleAnimation.EasingFunction>
            <SineEase EasingMode="EaseInOut" />
          </DoubleAnimation.EasingFunction>
        </DoubleAnimation>
      </Storyboard>
      <Storyboard x:Key="PanLeft">
        <DoubleAnimation Storyboard.TargetName="Pan"
                         Storyboard.TargetProperty="(TranslateTransform.X)"
                         By="-10"
                         Duration="0:0:0.25">
          <DoubleAnimation.EasingFunction>
            <SineEase EasingMode="EaseInOut" />
          </DoubleAnimation.EasingFunction>
        </DoubleAnimation>
      </Storyboard>
      <Storyboard x:Key="PanRight">
        <DoubleAnimation Storyboard.TargetName="Pan"
                         Storyboard.TargetProperty="(TranslateTransform.X)"
                         By="10"
                         Duration="0:0:0.25">
          <DoubleAnimation.EasingFunction>
            <SineEase EasingMode="EaseInOut" />
          </DoubleAnimation.EasingFunction>
        </DoubleAnimation>
      </Storyboard>
      <Storyboard x:Key="PanUp">
        <DoubleAnimation Storyboard.TargetName="Pan"
                         Storyboard.TargetProperty="(TranslateTransform.Y)"
                         By="-10"
                         Duration="0:0:0.25">
          <DoubleAnimation.EasingFunction>
            <SineEase EasingMode="EaseInOut" />
          </DoubleAnimation.EasingFunction>
        </DoubleAnimation>
      </Storyboard>
      <Storyboard x:Key="PanDown">
        <DoubleAnimation Storyboard.TargetName="Pan"
                         Storyboard.TargetProperty="(TranslateTransform.Y)"
                         By="10"
                         Duration="0:0:0.25">
          <DoubleAnimation.EasingFunction>
            <SineEase EasingMode="EaseInOut" />
          </DoubleAnimation.EasingFunction>
        </DoubleAnimation>
      </Storyboard>
    </Window.Resources>
  <Grid>
    <Border Grid.Row="1"
            Name="border"
            ClipToBounds="True">
      <Image Name="PictureToScale"
             RenderTransformOrigin="0.5, 0.5"
             Source="XYZ.JPG">
        <Image.RenderTransform>
          <TransformGroup>
            <ScaleTransform x:Name="Scale"
                            ScaleX="1"
                            ScaleY="1" />
            <TranslateTransform x:Name="Pan" />
          </TransformGroup>
        </Image.RenderTransform>
      </Image>
    </Border>
  </Grid>
</Window>

De code-behind is een afgeslankte variant op het demo project van Microsoft. Ik onthoud de laatst positie gemeten positie en hou referenties vast naar de storyboards. De precisie en de Kinect Sensor blijven onveranderd.

Kinect3d

Bij het starten van de applicatie laat ik de Kinect initialiseren en reageer ik alleen op de positie van de nek. Want het hoofd kan ook schuin gehouden worden en dat wil ik negeren. De magie zit in het “SensorSkeletonFrameReady” event waarbij de positie van dit nekgewricht wordt gemeten.

De code behind is dus:

/// <summary>
/// Interaction logic for MainWindow.xaml
/// </summary>
public partial class MainWindow : Window
{
  private Storyboard storyboardZoomIn;
  private Storyboard storyboardZoomOut;
  private Storyboard storyboardPanLeft;
  private Storyboard storyboardPanRight;
  private Storyboard storyboardPanUp;
  private Storyboard storyboardPanDown;

  private KinectSensor sensor;

  // Kinect precision: less is more responsive
  private double _precision = 0.025;

  private double _lastPositionX;
  private double _lastPositionY;
  private double _lastPositionZ;

  /// <summary>
  /// Initializes a new instance of the MainWindow class.
  /// </summary>
  public MainWindow()
  {
    InitializeComponent();

    // wait some time to get to the starting position...
    Thread.Sleep(4000);

    Mouse.OverrideCursor = Cursors.None;

    Storyboard storyboardStart = (Storyboard)TryFindResource("Start");
    storyboardStart.Begin(this);

    storyboardZoomIn = (Storyboard)TryFindResource("ZoomIn");
    storyboardZoomOut = (Storyboard)TryFindResource("ZoomOut");
    storyboardPanLeft = (Storyboard)TryFindResource("PanLeft");
    storyboardPanRight = (Storyboard)TryFindResource("PanRight");
    storyboardPanUp = (Storyboard)TryFindResource("PanUp");
    storyboardPanDown = (Storyboard)TryFindResource("PanDown");
  }

  /// <summary>
  /// Execute startup tasks
  /// </summary>
  /// <param name="sender">object sending the event</param>
  /// <param name="e">event arguments</param>
  private void WindowLoaded(object sender, RoutedEventArgs e)
  {
    // Look through all sensors and start the first connected one.
    // This requires that a Kinect is connected at the time of app startup.
    // To make your app robust against plug/unplug,
    // it is recommended to use KinectSensorChooser provided in Microsoft.Kinect.Toolkit
    foreach (var potentialSensor in KinectSensor.KinectSensors)
    {
      if (potentialSensor.Status == KinectStatus.Connected)
      {
        this.sensor = potentialSensor;
        break;
      }
    }

    if (null != this.sensor)
    {
      // Turn on the skeleton stream to receive skeleton frames
      this.sensor.SkeletonStream.Enable();

      // Add an event handler to be called whenever there is new color frame data
      this.sensor.SkeletonFrameReady += this.SensorSkeletonFrameReady;

      // Start the sensor!
      try
      {
        this.sensor.Start();
      }
      catch (IOException)
      {
        this.sensor = null;
      }
    }
  }

  /// <summary>
  /// Execute shutdown tasks
  /// </summary>
  /// <param name="sender">object sending the event</param>
  /// <param name="e">event arguments</param>
  private void WindowClosing(object sender, System.ComponentModel.CancelEventArgs e)
  {
    if (null != this.sensor)
    {
      this.sensor.Stop();
    }
  }

  /// <summary>
  /// Event handler for Kinect sensor's SkeletonFrameReady event
  /// </summary>
  /// <param name="sender">object sending the event</param>
  /// <param name="e">event arguments</param>
  private void SensorSkeletonFrameReady(object sender, SkeletonFrameReadyEventArgs e)
  {
    Skeleton[] skeletons = new Skeleton[0];

    using (SkeletonFrame skeletonFrame = e.OpenSkeletonFrame())
    {
      if (skeletonFrame != null)
      {
        skeletons = new Skeleton[skeletonFrame.SkeletonArrayLength];
        skeletonFrame.CopySkeletonDataTo(skeletons);
      }
    }

    if (skeletons.Length != 0)
    {
      foreach (Skeleton skel in skeletons)
      {
        if (skel.TrackingState == SkeletonTrackingState.Tracked)
        {
          // Otherwise use JointType.ShoulderCenter
          this.MoveImage(skel, JointType.Head);

          break;
        }
      }
    }
  }

  private bool PersonMovedLeftRight(SkeletonPoint skeletonPoint)
  {
    return (Math.Abs(skeletonPoint.X - _lastPositionX) > _precision);
  }

  private bool PersonMovedUpDown(SkeletonPoint skeletonPoint)
  {
    return (Math.Abs(skeletonPoint.Y - _lastPositionY) > (_precision));
  }

  private bool PersonMovedInOut(SkeletonPoint skeletonPoint)
  {
    return (Math.Abs(skeletonPoint.Z - _lastPositionZ) > _precision);
  }

  /// <summary>
  /// Move the image
  /// </summary>
  /// <param name="skeleton">skeleton to draw bones from</param>
  /// <param name="jointType">joint to start drawing from</param>
  private void MoveImage(Skeleton skeleton, JointType jointType)
  {
    Joint joint = skeleton.Joints[jointType];

    if (joint.TrackingState == JointTrackingState.NotTracked
          || joint.TrackingState == JointTrackingState.Inferred)
    {
      return;
    }

    if ((_lastPositionX == 0)
          && (_lastPositionY == 0)
          && (_lastPositionZ == 0))
    {
      _lastPositionX = joint.Position.X;
      _lastPositionY = joint.Position.Y;
      _lastPositionZ = joint.Position.Z;
    }

    if (PersonMovedLeftRight(joint.Position))
    {
      if (joint.Position.X < _lastPositionX)
      {
        //left
        storyboardPanLeft.Begin(this);
      }
      else
      {
        if (joint.Position.X > _lastPositionX)
        {
          //right
          storyboardPanRight.Begin(this);
        }
      }

      _lastPositionX = joint.Position.X;
    }

    if (PersonMovedUpDown(joint.Position))
    {
      if (joint.Position.Y < _lastPositionY)
      {
        //down
        storyboardPanDown.Begin(this);
      }
      else
      {
        if (joint.Position.Y > _lastPositionY)
        {
          //up
          storyboardPanUp.Begin(this);
        }
      }

      _lastPositionY = joint.Position.Y;
    }

    if (PersonMovedInOut(joint.Position))
    {
      if (joint.Position.Z < _lastPositionZ)
      {
        //in
        storyboardZoomOut.Begin(this);
      }
      else
      {
        if (joint.Position.Z > _lastPositionZ)
        {
          //out
          storyboardZoomIn.Begin(this);
        }
      }

      _lastPositionZ = joint.Position.Z;
    }
  }
}

Is dit voldoende voor een 3D illusie? Bekijk het op http://youtu.be/5dupe4_UIQo en http://youtu.be/nMk5oSMXZmI .

Ik vind het zelf een heel aardig effect hebben. Maar er valt wel wat op aan te merken. Er gaat na enige tijd een afwijking optreden in het aansturen met relatieve stappen. Een stuk naar links bewegen en een stuk naar rechts bewegen wilt niet zeggen dat de foto weer op het zelfde punt terug is. Hoewel de gevoeligheid fantastisch is (je hoofd/nek een paar centimeter bewegen wordt al geregistreerd) kan ik het verloop niet goed compenseren. Ik ken zelfs over de rand van de foto ‘vallen’ en dan is de illusie in één keer verdwenen. Daarom heb ik ook een sleep van een paar seconden er in staan. Dit geeft mij de tijd om in het midden van de kamer te gaan staan.

Maar zoals ik al gezegd heb, het is een leuke illusie en het kostte alleen wat prutsen in de avond. En mijn zonen vinden het ook gaaf, prima toch?

amBX lights met TFS 2010, een Deja Vu

Eind 2009 (het was de nacht voor kerstmis, je ziet de kerstboom op de achtergrond) heb ik een artikeltje geplaatst over het aansturen van ledverlichting met Team Foundation Service 2008. Het was een ludieke actie rond eenzelfde oplossing van een collega (gebaseerd op een dure electronica) maar ik gebruikte gewoon een lampensetje van 25 euro gekocht bij een computerzaak tesamen met een gratis DLL. (https://sandervandevelde.wordpress.com/tag/ambx-lights/ )

Deze oplossing was gebaseerd op het aanpassen van het buildscript en wat handig omgaan met WCF. Ik heb destijds nog gekeken of ik het ook aan de praat kreeg met TFS 2010 maar de buildscripts waren inmiddels door Workflow Foundation (WF4) vervangen en het paste dus niet meer op mijn laptopschermpje.

Vandaag heb ik mijn amBX setje uit het vet gehaald voor een ander klusje waarbij de lampen ook hun opwachting mogen maken. Ik kreeg mijn setje zelfs aan de praat op Windows 7 64 bits. Het kan nog steeds in combinatie met de oude 1.10 drivers! En dus dacht ik, er staat nog een klusje open…

Maar nu hebben we de Team Foundation Service API. Haal het even op… Na installatie staan er een hoop assemblies in C:\Program Files (x86)\Microsoft Visual Studio 10.0\Common7\IDE\ReferenceAssemblies\v2.0

Onderstaande oplossing werkt prima. Ik start de app even op en zie de status in de lampen terug.

using System;
using System.Collections.Generic;
using System.Linq;
using System.Net;
using System.Text;
using amBXLibrary;
using Microsoft.TeamFoundation.Build.Client;
using Microsoft.TeamFoundation.Client;
using Microsoft.TeamFoundation.Framework.Common;

namespace TfsBuildNotify
{
  internal class Program
  {
    private static int Main(string[] args)
    {
      try
      {
        string uri = "http:// s erver. c om:8080/tfs/prd";
        string teamProjectName = "teamprojectname";
        string buildDefinitionName = "builddefinitionname";
        string userName = "username";
        string password = "password";
        string domain = "domainname";
        bool readKey = true;
        using (var TeamProjectCollection =
          new TfsTeamProjectCollection(new Uri(uri),
          new NetworkCredential(userName, password, domain)))
        {
        TeamProjectCollection.Connect(ConnectOptions.IncludeServices);
        TeamProjectCollection.EnsureAuthenticated();
        IBuildServer buildServer =
          (IBuildServer)TeamProjectCollection.GetService(typeof(IBuildServer));
        var buildDefinitions = buildServer.QueryBuildDefinitions(teamProjectName);
        IBuildDefinition myBuildDefinition = null;
        foreach (var buildDefinition in buildDefinitions)
        {
          if (buildDefinition.Name == buildDefinitionName)
          {
            Console.WriteLine(buildDefinition.Name);
            myBuildDefinition = buildDefinition;
            break;
          }
        }
        if (myBuildDefinition != null)
        {
          var builds = buildServer.QueryBuilds(myBuildDefinition);
          // find current build in progress
          IBuildDetail myBuild = (from build in builds
            where build.Status == BuildStatus.InProgress
            select build).FirstOrDefault();
          if (myBuild == null)
          {
            // find last build started
            myBuild = (from build in builds
              orderby build.StartTime descending
              select build).FirstOrDefault();
          }
          if (myBuild != null)
          {
            // Check state of found build
            try
            {
              switch (myBuild.Status)
              {
                case BuildStatus.Failed:
                  amBXWrapper.PlayRed(200, 10);
                  break;
                case BuildStatus.InProgress:
                  amBXWrapper.PlayWhite(200, 10);
                  break;
                case BuildStatus.PartiallySucceeded:
                  amBXWrapper.PlayRed(1000, 5);
                  break;
                case BuildStatus.Stopped:
                  amBXWrapper.PlayRed(1800, 5);
                  break;
                case BuildStatus.Succeeded:
                  amBXWrapper.PlayGreen(1800, 5);
                  break;
                }

                Console.WriteLine("State: " + myBuild.Status.ToString());
              }
              catch (Exception ex)
              {
                throw new ArgumentException("amBX error: " + ex.Message);
              }
            }
            else
            {
              // no build found
              amBXWrapper.PlayWhite(1800, 5);
              Console.WriteLine("Found: None");
            }
          }
          if (readKey)
          {
            Console.ReadKey();
          }
        }
        return 0;
      }
      catch (Exception ex)
      {
        Console.WriteLine("Error: " + ex.Message);
        Console.ReadKey();
        return 1;
      }
    }
  }
}

Eerst haal ik de TeamProjectCollection van de server via mijn credentials. Mocht je tegen de beveiliging van TFS aanlopen, kijk dan eens naar deze blog . Daar staat prima uitgelegd hoe je met de credentials moet omgaan.

Vervolgens haal ik via de buildServer de BuildDefinitions voor ons teamproject op. Hierbij wil ik er speciaal eentje uitpikken…

En van die definitie probeer ik de meest recente build te achterhalen. Eerst kijk ik of er een build “in progress” is. Indien dit niet het geval is, probeer ik de laatst gestarte build te achterhalen.

Achteraf stuur ik de lampen aan nav. de status van de gevonden build. Het is dus een simpele oplossing voor een simpel probleem. De Build class ondersteunt ook events maar daar ben ik niet verder op in gegaan. Ook kan, indien je voldoende rechten hebt, een build beïnvloed worden (start/stop) of zelfs volledig met code aangemaakt worden.

Succes met je eigen builds.