This is part 4 of a series of blogs about device communication between Arduino, RaspberryPi etc:
- Part 1: Using I2C to connect two Arduino Nano’s
- Part 2: Using I2C between Rpi Master and Arduino Slave
- Part 3: Use Bluetooth between Win 10 UWP and Arduino
- Part 4: Add virtual Arduino ports to your UWP app using Firmata
- Part 5: Custom Firmata function called by Windows 10 IoT Core
- Part 6: Better long running custom Firmata functions
- Part 7: Custom servo usage in Firmata
- Part 8: Using NRF24L01+ modules between Arduino’s
- Part 9: Cheap Arduino mesh using RF24 radio modules
I have shown in my previous post that it’s fairly easy to control an Arduino over Bluetooth.
This was done using a ‘custom’ protocol. I sent an integer value to let a LED blink that number of times on the Arduino.
But designing your own protocol is not always that easy. And I can recommend using industry-wide accepted protocols if available.
One of them is Firmata.
“Firmata is a protocol for communicating with microcontrollers from software on a computer (or smartphone/tablet, etc). The protocol can be implemented in firmware on any microcontroller architecture as well as software on any computer software package”
This sounds promising, doesn’t it?
Using Firmata, it should be possible to access the ports on the Arduino directly from a UWP app, without extra custom code needed on the Arduino.
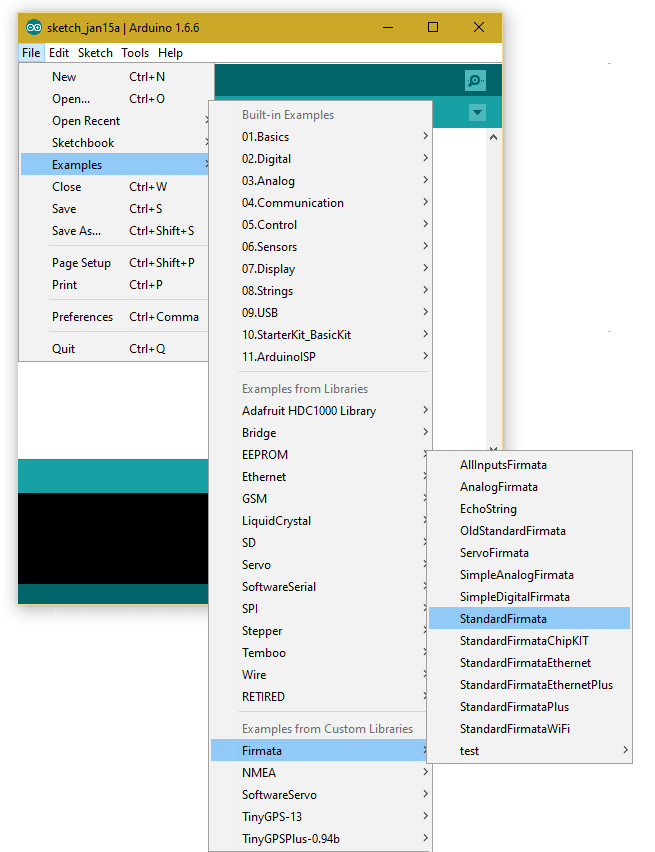
Of course, we NEED code on the Arduino, but that’s just a standard sketch, which is available in the examples library inside the Arduino IDE.
I just downloaded the latest version (now 2.5.1) of the Firmata Arduino library from the GIT repository because it was not yet available in the IDE. That’s why it is just in another place in the menu. Select the StandardFirmata sketch:
The Firmata protocol supports a connection between the UWP app and the Arduino using USB, Bluetooth and Wifi. In this example, we will use Bluetooth. There is one caveat, the baud rate used to communicate can vary with the board you use (it’s all about quality). Initially, it’s 57600 baud. I changed it into 9600 baud, just to make sure the communication speed will not be an issue.

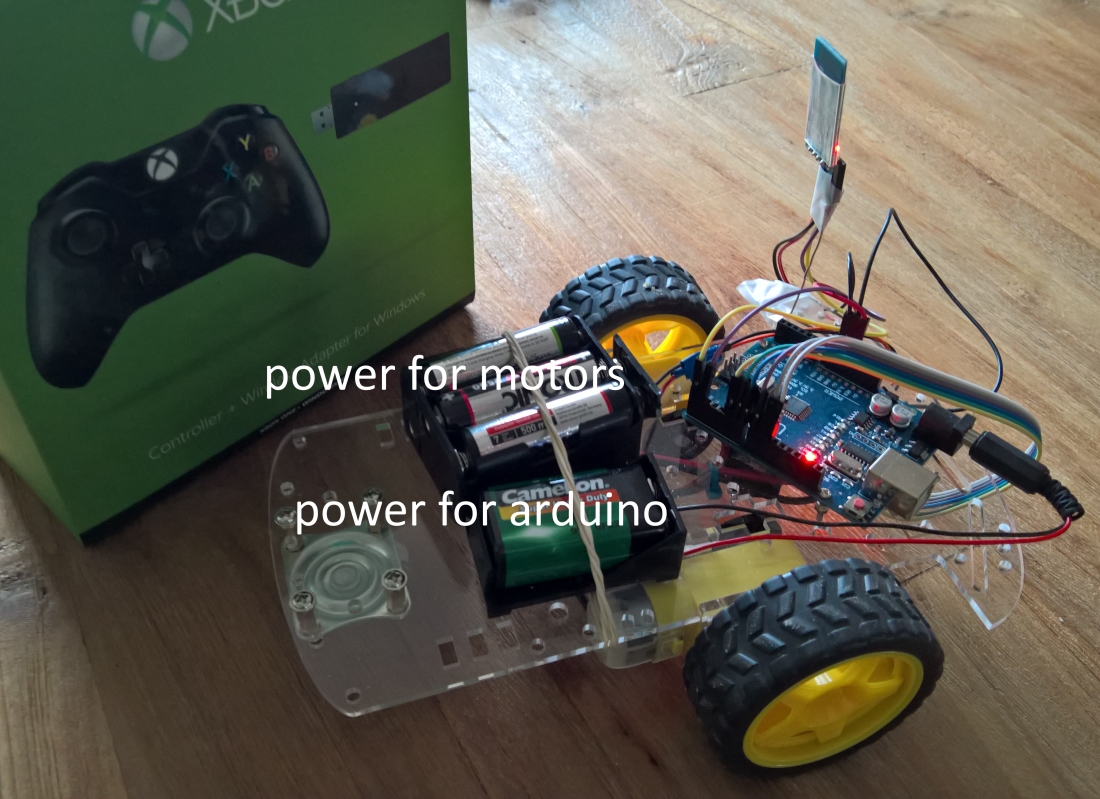
Upload the sketch. Plug in your Bluetooth module on port 0 and 1 (cross the RX and DX lines). That’s all we need to do on the Arduino.
Just to check if everything is working, Microsoft already provides a nice app. Download the Windows Remote Arduino Experience for free, just to test your Firmata sketch.
If your Arduino is connected to your PC using USB, first try to talk to it using the USB connection. Here I have selected the Bluetooth module (and I selected the correct baud rate, equal to the rate in the sketch):

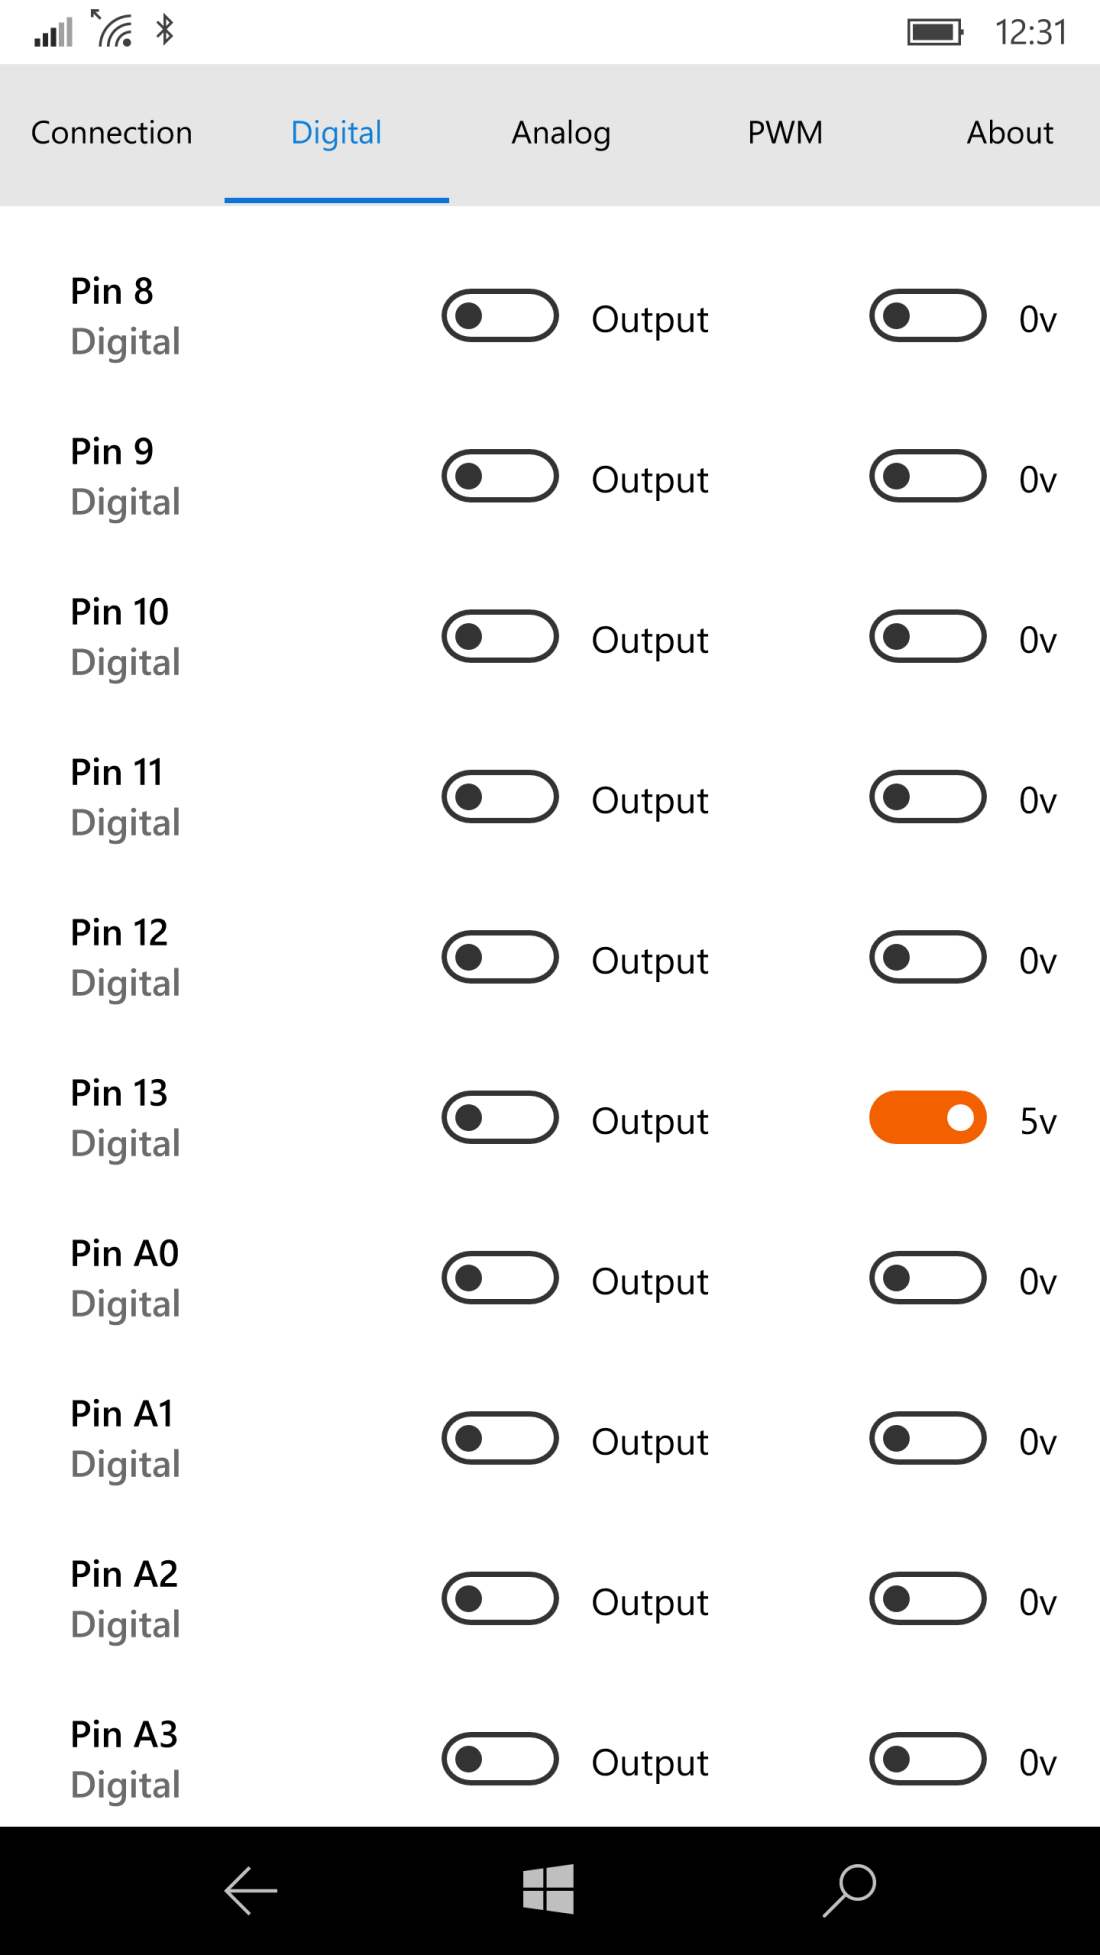
Either way, USB or Bluetooth, the outcome should be the same. The (digital) pin layout should be shown:

Now activate output pin 13. This is the standard available LED op the Arduino board. This LED should be lit. And yes, this also works on my Windows Phone:

Note: I got this message “Pin configuration not received” the first times I tried to connect to my Arduino using Bluetooth:

If you get this message, just check the serial port connection (pin 0 and 1) and the baud rate in the sketch.
So now we will do the same communication in our own UWP app.
Start a new UWP template. Add the Bluetooth capability to the list of capabilities in the Package.appxmanifest.
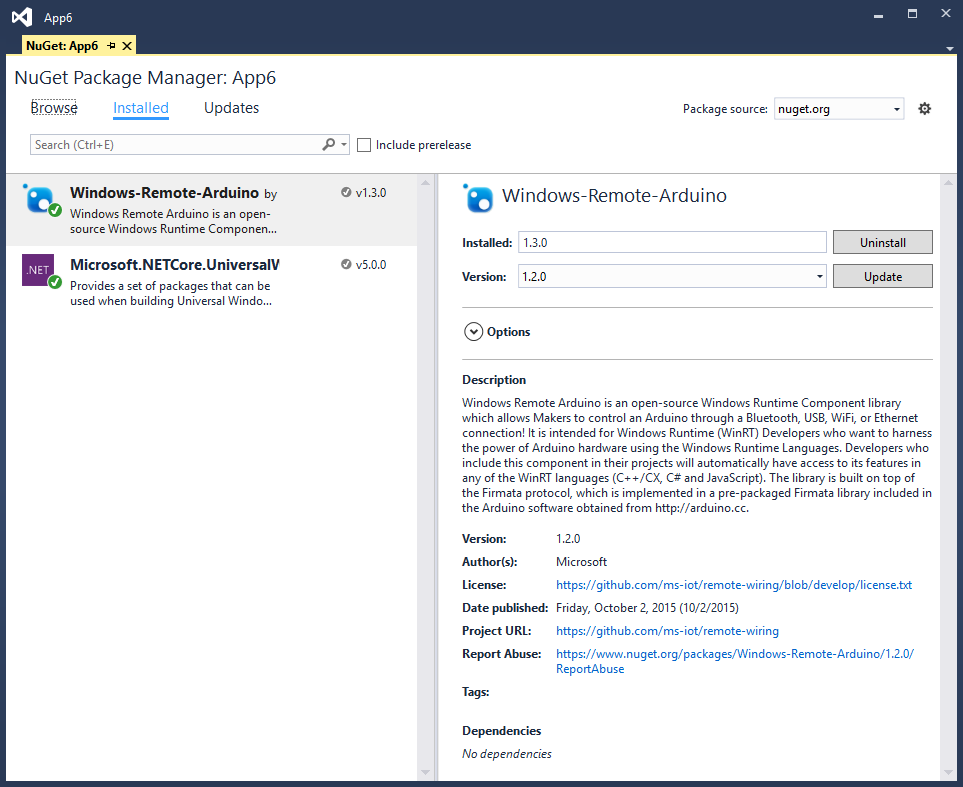
To communicate to a Firmata device, we also need the NuGet package called “Windows-Remote-Arduino”:
Our main page needs the following controls:
<StackPanel>
    <Button Name="btnList"
            Click="btnList_Click"
            FontSize="20"
            Content="List" />
    <Button Name="btnStart"
            Click="btnStart_Click"
            FontSize ="20"
            Content="Start" />
    <Button Name="btnOn"
            Click="btnOn_Click"
            FontSize="20"
            Content="Led On"
            IsEnabled="False" />
    <Button Name="btnOff"
            Click="btnOff_Click"
            FontSize="20"
            Content="Led Off"
            IsEnabled="False" />
</StackPanel>
And we need the following code-behind:
public sealed partial class MainPage : Page
{
    private BluetoothSerial _bluetooth;

    private RemoteDevice _arduino;

    public MainPage()
    {
        this.InitializeComponent();
    }

    private async void btnList_Click(object sender,
                                       RoutedEventArgs e)
    {
        var a = await BluetoothSerial.
                         listAvailableDevicesAsync();
        var b = a.First();
        var c = a.First(x => x.Name == "HC-05");
        var d = b.Name;
    }

    private void btnStart_Click(object sender,
                                       RoutedEventArgs e)
    {
        _bluetooth = new BluetoothSerial("HC-05");
        _arduino = new RemoteDevice(_bluetooth);
        _bluetooth.ConnectionLost +=
                     _bluetooth_ConnectionLost;
        _bluetooth.ConnectionFailed +=
                     _bluetooth_ConnectionFailed;
        _bluetooth.ConnectionEstablished +=
                     OnConnectionEstablished;
        _bluetooth.begin(0, SerialConfig.SERIAL_8N1);
    }

    private void _bluetooth_ConnectionLost(string message)
    {
        throw new NotImplementedException();
    }

    private void _bluetooth_ConnectionFailed(string message)
    {
        throw new NotImplementedException();
    }

    private void OnConnectionEstablished()
    {
        var action = Dispatcher.RunAsync(
                            CoreDispatcherPriority.Normal,
                            new DispatchedHandler(() =>
        {
            btnOn.IsEnabled = true;
            btnOff.IsEnabled = false;
        }));
    }

    private void btnOn_Click(object sender, RoutedEventArgs e)
    {
        //turn the LED, connected to pin 13, ON
        _arduino.digitalWrite(13, PinState.HIGH);

        var action = Dispatcher.RunAsync(
                           CoreDispatcherPriority.Normal,
                           new DispatchedHandler(() =>
        {
            btnOn.IsEnabled = false;
            btnOff.IsEnabled = true;
        }));
    }

    private void btnOff_Click(object sender, RoutedEventArgs e)
    {
        //turn the LED connected to pin 13 OFF
        _arduino.digitalWrite(13, PinState.LOW);

        var action = Dispatcher.RunAsync(
                           CoreDispatcherPriority.Normal,
                           new DispatchedHandler(() =>
        {
            btnOn.IsEnabled = true;
            btnOff.IsEnabled = false;
        }));
    }
}
First of all, we have to connect to the Bluetooth module. I added placeholder code for the ConnectionLost en ConnectionFailed events. Just so you can act on these circumstances (in case you get the name of the device wrong).
Note that the baud rate is set to 0 (zero). It just works 🙂
When the Bluetooth connection is up, the On button becomes available. Look at the code, we can write LOW or HIGH to digital ports. So we write to the output port 13. The LED on the board will be lit or unlit:

The Arduino class also supports reading and writing to analog ports. And I2C communication seems to be possible too.
Letting the LED blink several times, as in the previous blog post, is now trivial. It can be programmed just in C#.
The drawback of Firmata is that the real-time behavior of the Arduino is now limited by the speed of the calling UWP and the speed of the communication. And complex communication with exotic modules over several pins with specific timing will be hard or even impossible.
So if you need real-time interaction and still want to use Firmata, take a look at the Ignite presentation Windows IoT, UWP and the Remote Wiring API by Mitch Denny. He adds custom code to the Firmata sketch and executes it by name. Then he listens for the response which is received using an event handler. It acts just like a stored procedure in a database.
Update: The source code of the Windows Remote Arduino Experience app is available at GitHub.