MQTT is a publish-subscribe messaging transport protocol that was designed for constrained environments. It has become the go-to communication standard for IoT scenarios due to its efficiency, scalability, and reliability. IoT devices and applications can communicate with each other over MQTT, using two-way communication.
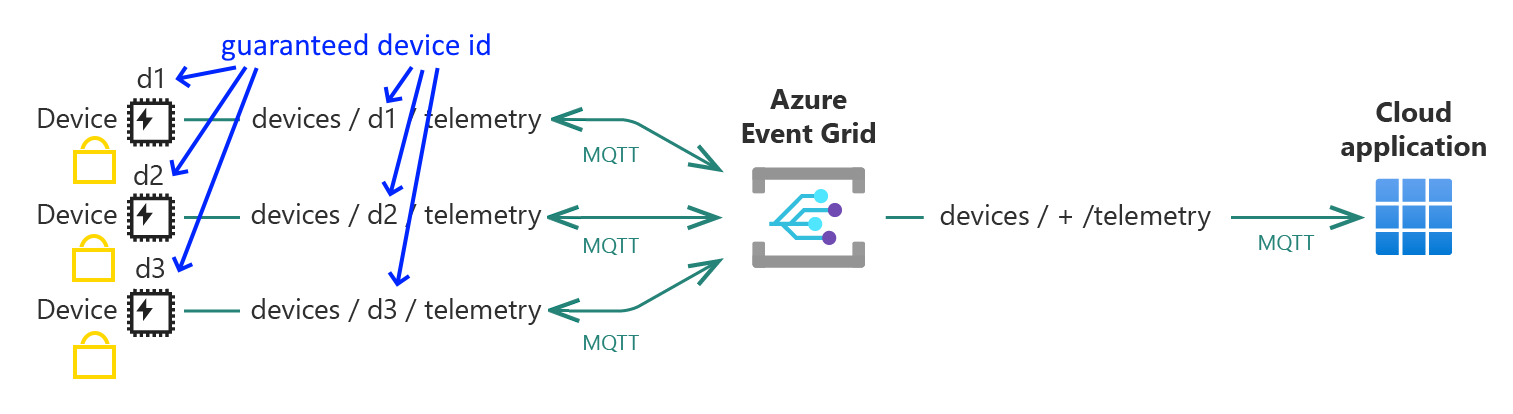
Recently, Azure Event Grid can also be used as an MQTT Broker to route MQTT messages to Azure services or custom endpoints for further data analysis, visualization, or storage. This integration with Azure services enables you to build data pipelines that start with data ingestion from your IoT devices:

What we get is an MQTT Broker in the cloud so devices can send messages to all other devices or just a few devices (or even one device).
The same goes for applications; this could be an alternative to WebSockets.
Azure Event Grid’s MQTT support enables you to accomplish the following scenario where each device uses its own channel to prevent spoofing:
Telemetry published on the broker can also be forwarded to other Azure services using an Event Grid topic (this is an extra Azure resource) that can be consumed by those services. This is managed via the Event Grid namespace routing option.
Let’s have a first look at this Event Grid support for MQTT and find out how to set this service up and consume its features.
Note: Azure Event Grid Namespace MQTT Broker support (unofficial nickname: IoTGrid) is now marked with general available. This post was written when it was still in Public Preview. If you see differences, check out the current capabilities and limitations here.
This post is part one of a series of posts regarding the EventGrid namespace support for MQTT:
- A first look at Azure Event Grid MQTT support
- Connect ESP32 to EventGrid over MQTT with Nanoframework
The steps in this post to perform are:
- Generate client certificates (we need them later on to trust clients)
- Create an Event Grid namespace with MQTT enabled
- Register clients (the devices or applications)
- Explorer topics supported in this namespace (bundled in a topic space)
- Bind client groups to topic spaces (using permission binding)
- Connect clients, send and receive messages
- Preventing spoofing with topics containing client related variable
- Anti-spoofing in action
- Route published messages to an EventHub
There is much to do so let’s get started.
Note: The documentation comes with a number of tutorials and quick starts. Parts of this post are based on those articles.
Generate client certificates
Because clients need to authenticate themselves via certificates, we will generate these first.
In this post, we go for the simple certificate thumbprint authentication. This could be compared to authentication with a password, now put in a file.
Note: ‘IoTGrid’ access can also be secured in a better way using an X.509 CA certificate chain. For detailed steps on using an X.509 CA certificate chain for clients, check out this documentation.
Note: To be able to test the certificate chain, the generated ‘intermediate_ca.crt’ must be uploaded to the portal. This file is accepted, opposite to what the dialog is telling you. Just select that filename and upload it. Just rename that (public) ‘intermediate_ca.crt’ to ‘intermediate_ca.pem’ and it is accepted in the Azure portal.
As seen in the quickstart, generating self-signed client certificates is not that hard.
First, generate a root certificate and an intermediate certificate using this Step CLI tooling:
// when in user folder on file system
mkdir blog
cd blog

step ca init --deployment-type standalone --name MqttBlogAppSamplesCA --dns localhost --address 127.0.0.1:443 --provisioner MqttBlogAppSamplesCAProvisioner --context blog
The root and intermediate certificates are generated:

Notice I added a context. By altering the context per project, the Step tooling knows how to separate multiple versions of executions. Check the current context with:
step context currentImportant: remember to keep a copy of that root certificate-related password! We need it to generate the client certificates.
With this in place, we can generate client certificates, like the first client ‘client1’:
step certificate create client1-authn-ID client1-authn-ID.pem client1-authn-ID.key --ca ../.step/authorities/blog/certs/intermediate_ca.crt --ca-key ../.step/authorities/blog/secrets/intermediate_ca_key --no-password --insecure --not-after 2400h

step certificate fingerprint client1-authn-ID.pem
Notice that you will be asked to enter that root certificate password.
Note: I generate the client certificates in a subfolder. So I have added that extra ‘one folder up’ to the paths of the CA certs. This compensates for the relative paths.
The client certificate and thumbprint are generated:

Keep a copy of that client ID and thumbprint for later usage.
You can check the expiration date of the client certificate too (100 days from now):

Repeat this client certificate creation for a second client ‘client2’ and a third client ‘client3’ too (keep the client id and the two file names in the command line on par).
Eventually, you now have three client IDs and thumbprints.
Let’s create an ‘IoTGrid’ so we can register the devices.
Create an Event Grid namespace with MQTT enabled
We start with creating an Azure Event Grid namespace:

Just using a unique name and selecting the region should be enough.
Disabling availability zones could save some money.
Notice that skipping the zone redundancy is currently limited to a few regions. Check the deployment if this works in your region:

After creation, we need to go to the configuration page of the new service and activate MQTT:

There is just one checkbox:

Keep the other settings, appearing when the checkbox is checked, untouched.
Note: Once the MQTT support is activated, this change cannot be reversed.
Press apply. This can take a minute or two. Or five.
Once applied, you now have an MQTT broker reachable in the cloud via the MQTT hostname:

Notice there is also an HTTP hostname. This is out of scope in this post.
with the ‘openssl’ command (typically executed in a WSL environment) you can see the MQTT endpoint (on port 8883) is expecting TLS security using the Digicert Global Root G3 certificate:

So the MQTT broker is encrypting the communication on TLS level.
Note: This is securing the channel. This has nothing to do with securing identities as we will see in the next paragraph.
Let’s start registering clients.
Register clients (the devices or applications)
On the Clients page, add a new client:

Just fill in a simple name (client1), the unique client identifier as seen in the certificate (client1-authn-ID) by overriding the generated identifier, and enter the thumbprint you saved (select ‘Thumbprint match’ in the Validation scheme dropdown):

Notice the client attributes. These are tags describing the context and features of this device. It is useful for adding (new) devices to (existing) device groups. We use it later on in this post.
Create the client by applying the changes.
The client is created.
Repeat this for clients 2 and 3:

In the end, we now have three clients.
These clients are already grouped using the default client group named ‘$all’:

The ‘IoTgrid’ does not support binding topic access permissions to individual clients, it binds topic spaces (containing one or more topics) to client groups (containing one or more clients). It’s up to you to make client groups containing just one client, of course.
What about using root or intermediate certs for authentication?
If you want to validate the client certificates using the CA certificate chain, select the scheme ‘Subject Matches Authentication Name’ on the client creation page:

Notice you do not need to fill in extra (secret) information.
This works in conjunction with the uploaded Root CA or Intermediate CA certificate on the CA Certificates page:

Notice that you can upload only .pem and .cer files.
If you used the STEP CLI tool to generate the root and intermediate certificates, you probably need to rename the public files generated.
Just rename that (public) ‘intermediate_ca.crt’ to ‘intermediate_ca.pem’ and it is accepted in the Azure portal.
When your device is connected, test the intermediate cert usage by removing the cert registration in the portal. Your device is not able to reconnect anymore.
Explorer topics supported in this namespace (in a topic space)
MQTT works with topics as separate communication channels.
The ‘IoTGrid’ works with clusters of topics (called topic spaces) so these can be assigned to client groups.
We create a very simple topic space:

We just add one topic named ‘telemetry/#’ in a space named ‘AllTopics’:

This topic contains the wildcard ‘#’ so as long as the messages are sent over a topic starting with ‘telemetry’, this will be accepted for this topic space.
Note: we could have used ‘#’ as a topic to accept literally everything.
Our topic space is created:

Let’s connect the topic space with the client group.
Bind client groups to topic spaces (using permission binding)
We need to enable access to topic spaces by binding client groups with the right permissions:

We want to give all client publish rights to all topics:

Create this binding.
This binding is perfect if you want to allow all devices to send every message to the cloud.
But this also means not a single client can listen to these messages…
So let’s register all clients to all topics as subscribers:

We have given all clients publish and subscribe rights to all topics:

Our ‘IoTGrid’ is now configured and ready for clients to start communicating.
We can monitor client communication by switching over to MQTT monitoring in the monitoring part of the overview:

Individual messages cannot be seen at this level though. And that is OK.
On the specific Metrics page, even more MQTT metrics are made available, including client connects and disconnects.
Connect clients, send and receive messages
As seen in the original Quick Start, we create clients using the MQTTX tool.
A client is called a connection in this tool so let’s add one:

There are a number of fields to fill in:
- Add a unique name like ‘client1’
- Add a Client ID. The documentation mentions using this field for additional identity checks. Because we have not implemented these checks, it seems we can fill in whatever we want.
- Fill in the Host URI and port number. The hostname is found in the Azure portal as the MQTT hostname on the Essentials pane. The port number is 8883 (Where can we find this number in the Azure portal?)
- The user name must be on par with the name we entered during the creation of the client certificate. Fill in ‘client1-authn-ID’
- Check SSL/TLS to open the Certificates dialog. This is needed because the user name must be combined with the thumbnail found in the self-signed client certificate. So, select Self-signed and fill in the name of the pem file and the key file
- These files are found in the original folder you use to create the client certificates
This should look like this:

Save the settings.
If everything is filled in correctly, the client should connect automatically:

Repeat this for client 2 (we keep client 3 apart for the next paragraph):

Now, add for each client a subscription to the topic “telemetry/#”:

Keep all other settings and confirm:

Make sure both clients are subscribed.
Now select the first client and publish a message on the topic ‘telemetry/client1’:

Notice how this topic differs (just a little) from the topic registered in the portal. We fill in a specific value instead of the wildcard.
Once you publish the message, it arrives at client two (a little notification number is shown):

See how the message has arrives at the other client:

Play around and see how the two clients can exchange messages.
Check the metrics of the portal too:

Connecting an Advantech ICR industrial router
For client 3 I set up an Advantech ICR router, capable of running Node-RED as a custom package:

Node-RED is a programming tool for wiring together hardware devices, APIs, and online services in new and interesting ways. It provides a browser-based editor that makes it easy to wire together flows using the wide range of nodes in the palette that can be deployed to its runtime in a single click. It comes with MQTT nodes by default.
Note: If you want to play along without having that router, install Node-RED and test it yourself.
The ICR can run one or more custom applications, including Node-RED, available for download on the website:

Node-RED is only available for the 3 and 4 series:

Note: Node-RED relies on a Node.js installation.
In the configuration dashboard of the ICR router, you can install the applications.
I installed both Node.js and Node-RED:

After installation, the NodeRed flows are available on port 1880 of the ICR:

If you installed Node-RED on your laptop, you could access Node-RED on your own machine too:

Just browse to that URL.
Within Node-RED, MQTT nodes are selectable from the palette:

We want to publish messages so we need to connect both the MQTT Out node and the Inject node:

Drop both nodes on the flow and draw a line between output and input.
The inject node sends a JSON payload when its button is pushed, that message is then picked up by the MQTT node.
First, we change the inject node. Change the ‘timestamp’ field into JSON:

Change the payload into valid JSON:

Next, we change the MQTT node:

Give the node a name (client3icr), fill in the topic (I kept ‘telemetry/client1’), select 0 for QoS, and fill in the server and authentication-related settings by adding a new MQTT Broker page (hitting that button with the pen icon next to the server settings):

On the new page, give the MQTT Broker settings a proper name (like ‘ehconnection’).
On the connection tab, fill in the server URL and port number (as seen above).
On the security tab of the MQTT broker page, fill in the same name as found in the certificate (client3-authn-ID):

Last, but not least, add a new TLS config by checking the ‘Use TLS’ checkbox.
Open the dialog via the icon button:

Give the TLS config a proper name (client3Cert) and upload the two certificates related to client 3:

Save everything on all dialogs so you come back in the Node-RED flow.
Hit the Deploy button and you get the message the flow is successfully deployed:

If all settings are set correctly, our ICR is connected to the Event Grid MQTT Broker (notice ‘connected’ in green next to the MQTT node).
It’s time to send messages from the Advantech ICR router:
Hit the inject button and you get a message the injection succeeded:

In MQTTX, the other two clients are still connected.
Both receive the ICR message:

We are able to connect industrial hardware like the Advantech ICR router to the MQTT broker now. Actually, everything running Node-RED can be connected.
Note: unfortunately, many industrial devices use a name and password as MQTT authentication. At this moment, this is not supported…
But wait a minute:

For those with a keen eye, you may have noticed a little ‘security challenge’ in the current approach: spoofing.
Preventing spoofing with topics containing client related variable
If you look closely at the received messages, you can notice something less secure is happening:

The Advantech ICR is sending messages over the topic telemetry/client1 (the same goes for client 2).
Subscribers to MQTT topics do not get to see the names of the publisher clients of messages on that topic.
So Device A can claim it is Device B if it knows the right topic and probably the content structure of the message sent. It acts as the other device, sending false information.
This is called spoofing.
The Event Grid MQTT Broker is in control of all topics and clients. What if we could filter access to topics based on the client ID?
Luckily, we can prevent spoofing using this principle precisely!
We can add special topics where the parameters of it are related to the device identification.
For example, we can create a topic template like this ‘device/${client.authenticationName}/telemetry’ where the authentication name will be replaced by the client ID like ‘client1-authn-ID’.
This way, client ‘client1-authn-ID’ is the only client able to send messages over the topic ‘device/client1-authn-ID/telemetry’.
This takes away one of the biggest ‘security challenges’ of MQTT!
Let’s see that in action.
BTW. We also look at splitting up senders and receivers.
Anti-spoofing in action
To show how this works, I arranged a second Event Grid MQTT broker.
In this ‘IoTGrid’, I declared up to five clients:

Notice that Client1 has only one change compared to the previous registration, it now contains an extra client attribute called ‘type’ with the value ‘sender’.
This client 1 is part of the client group named ‘senders’ along with other clients like client 3, client 4, and client 5:

Client 2 has a ‘type’ attribute with the value ‘receiver’:

This client is part of the client group named ‘receivers’.
So, we have two groups of clients, without overlap:

Both client groups are bound to only a single topic space:

Notice that clients in the ‘senders’ client group have only permission to publish on topics part of their topic space. Clients in the ‘receivers’ client group can only receive messages on topics bound to them in their topic space.
Regarding the sender space, clients can only address topics having their own authentication name:

If a client tries to send messages to topics not honoring this constrained topic template format, the messages are not forwarded to any receiver by the broker, the ‘IoTGrid’.
Regarding the receiver, here we listen to all messages coming from all clients in the sender group.
To do this, another wildcard is used, the plus sign (‘+’). This can be replaced by only one part of the topic (it represents any value in that level of the topic hierarchy):

We could have made the receiver topic even more strict by introducing the authentication name variable in the template too. In that case, receivers can only receive messages sent to themselves directly. Notice, in that case, the sender needs to know the name of the sender upfront. It is possible to combine this functionality with the client attributes (like ‘${client.attributes.x}’).
In our case, the outcome is that only client2 (the only receiver) can receive messages from all clients on that specific topic, where the + sign is replaced by the clients with their own client name.
In that case, the Advantech ICR is the only device capable of sending this message:

This is how the ‘IoTGrid’ prevents spoofing.
Route published messages to an EventHub
We have experienced how senders and receivers work together by sending and receiving messages on various topics.
What if we can send incoming messages to other Azure resources…
This is possible using MQTT routing:

All we have to do is to enable routing to an Event Grid topic.
This is not a topic seen in MQTT or the topic part of the Event Grid namespace.
No, you first need to create a separate resource in the subscription called an Event Grid topic:

As you can see, I added one subscription which will receive all messages sent to the Event Grid topic endpoint:

The subscription is pointing to an EventHub so all messages can be forwarded to other Azure services subscribed to the Event Hub:

The Event Grid namespace MQTT support is still in preview. There are a number of considerations to take care of:

I have been in contact with the Product Team regarding the ‘your AD user name’ part in the role assignment. I do not want to be part of the RBAC between these two services. The Product Team is currently addressing this.
Once the routing relationship is set up, you will see routed messages appear in the EventHub:

An incoming message looks like this:
[
  {
    "id": "dbde999a-6250-46a8-bf83-0a5ab28337c6",
    "source": "event-grid-mqtt-test-weu-egns",
    "type": "MQTT.EventPublished",
    "data_base64": "eyJzb3VyY2UiOiJBZHZhbnRlY2ggSUNSIn0=",
    "time": "2023-10-13T11:38:18.3780000",
    "specversion": "1.0",
    "subject": "device/client5-authn-ID/telemetry",
    "devicestype": "sender",
    "EventProcessedUtcTime": "2023-10-13T21:10:25.4495325Z",
    "PartitionId": 0,
    "EventEnqueuedUtcTime": "2023-10-13T11:38:19.5950000Z"
  },
The subject is the route with the now guaranteed client ID.
Here, the message is made available as base64 string so it has to be decoded before it can be used. It seems HTML 5 could offer plain text messages using the payload format indicator or the context type.
Notice the ‘devicetype’. This seems to be the ‘type’ client attribute?
It is! How?
This is the magic of message enrichment, part of the routing options performed by the ‘IoTGrid’:

It seems we are receiving all incoming messages coming from all MQTT topics.
Routed messages can be filtered using eg the Cloud Event scheme “subject” property or payload filtering:

The EventGrid Topic subscription filters look like this:

Regarding the subject filter, only one MQTT topic can be used as a filter. If topics differ too much, multiple subscriptions must be created.
Notice the routing message enrichment can be used as a filter too:

It is even possible to filter on message body (data) properties if the message body can be serialized to JSON. This is supported using MQTT v5. See also the documentation.
Here, we use the custom Event Grid Topic resource because this is a working solution.
It seems there is a cost impact while using this EventGrid Topic subscription filter. All topic communication is routed. This could include device-to-device communication too, perhaps solely meant for sharing between devices only. So, a chatty grid of devices could unwillingly lead to higher routing costs.
It is expected this cost impact will be drastically reduced once the service matures over time.
Sample C# client
We just connected a few clients to the broker using the MQTTX tool and NodeRED.
The IoTGrid documentation also references clients coded in either C, C#, Go, or Python.
Just check the readme of the repo and notice there is a Get Started sample.
I wrote a little .Net 7 console app referencing the C# MQTT Client Extensions library:
using MQTTnet;
using MQTTnet.Client;
using MQTTnet.Client.Extensions;

internal class Program
{
	static async Task Main(string[] args)
	{
		Console.WriteLine("Hello, World!");

		var cs = MqttConnectionSettings.CreateFromEnvVars();
		var mqttClient = new MqttFactory().CreateMqttClient(MqttNetTraceLogger.CreateTraceLogger());
		var connAck = await mqttClient!.ConnectAsync(new MqttClientOptionsBuilder().WithConnectionSettings(cs).Build());

		Console.WriteLine($"Connected: {connAck!.IsSessionPresent}");
		Console.WriteLine($"Write a message and press enter. Line for line.");

		while (true)
		{
			var msg = Console.ReadLine();
			if (msg == "exit")
			{
				break;
			}

			var appMsg = new MqttApplicationMessageBuilder()
				.WithTopic("telemetry/prio1/client1")
				.WithPayload(msg)
				//.WithAtLeastOnceQoS()
				.Build();

			await mqttClient.PublishAsync(appMsg);
		}
	}
}
It can send multiple messages using the while loop.
Receiving messages is done with:
mqttClient.ApplicationMessageReceivedAsync += (s) =>
{
	Console.WriteLine($"Client '{s.ClientId}' received on topic '{s.ApplicationMessage.Topic}' the following message:\n{System.Text.Encoding.UTF8.GetString(s.ApplicationMessage.Payload)}");

	return Task.CompletedTask;
};

await mqttClient.SubscribeAsync("message/#", MQTTnet.Protocol.MqttQualityOfServiceLevel.AtLeastOnce);
You need to provide several environment variables like:

Note: Do not forget to restart Visual Studio Code after adding or changing (user) environment variables.
System Topic events
What about non-telemetry messages?
The EventGrid namespace can also emit Device connectivity events and life cycle events so you learn about what happens regarding the registration of devices and connectivity.
These are called System topics.
In the EventGrid menu, check the Events page:

There you can see a System topic can be attached to many resources. We check the EventHub:

We need to fill in the right values:

Give this Event subscription a proper name.
An EventGrid System Topic will be created so give that one a proper name too.
Next, select which system event types you like to receive:
- Session connection
- Session disconnection
- Client creation or update
- client deletion
I selected all.
Next, we need to fill in which (already created) EventHub will receive the events:

Save all this. An Event Grid System topic is created:

Here I demonstrate a client 1 creation, session connection, and session disconnection are picked up:

This gives us full control over historical life-cycle changes.
Now we can check eg. which devices have bad connectivity (because these are connecting and disconnecting all the time).
Try it out, also with the webhook so you get a notion of how fast the connect/disconnect events are raised.
IoTHub vs. IoTGrid
I already have been asked some questions about comparing this new ‘IoTGrid’ with the trusted IoTHub.
I stopped comparing the two services. It’s like comparing apples with pears because each serves another goal.
The IotHub is great for (edge) devices supporting two-way connections, provisioning, and device twins, out of the box.
The ‘IoTGrid’ supports plain MQTT (great for constrained devices) where devices can exchange messages without the need to build a custom cloud logic. This is one of the most seen questions about IoTHub. Just choose the right tool for your solution.
There are small improvements like support for up to twenty message enrichments (compared to 10 on IoT Hub).
The device connection heartbeat notifications are captured at intervals of 60 seconds with IoT Hub, IoTGrid knows about connectivity in real-time (just like WebSockets). That means it’s difficult to understand precisely when a device connects and disconnects multiple times in less than a minute.
You need to rethink the Device Twin implementation because there is nothing set up yet. The message enrichments could be seen as device twin tags but for the rest you are on your own.
Diagnostics
The EventGrid Namespace also offers diagnostics.
This helps you to diagnose certain conditions like messages not arriving at the MQTT broker due to misconfiguration of the topics concerning the permission bindings.
First, add a new ‘Diagnostic setting’ in the Diagnostic settings page:

Once this is enabled, after a few minutes the first diagnostics information is made available in the related Log Analytics workspace.
On the Logs page, check the tables starting with ‘EGN’:

Here you see several messages explaining incoming messages are dropped because the devices are not authorized for these topics.
Conclusion
For an introduction to the new features of the ‘IoTGrid’ we covered a lot!
Although the ‘IotGrid’ is still in public preview, the MQTT part is working as expected taking the limitations into account.
We have seen how to register client groups and topic spaces, and how to bind them using permissions.
We have experienced how the traditional MQTT spoofing problem is solved using topic templates containing variables.
We have also routed incoming messages on the ‘IoTGrid’ to other Azure services via the EventHub.
Alongside this, we learned how to consume the MQTT broker using various clients including Node-RED and the Advantech ICR router.
Although the service is still in public preview, the wide number of application possibilities is very promising. My biggest point of attention is support for more industrial devices that do not understand certificates. The extra routing costs due to insufficient upfront filter capabilities should be fixed too in the future, in my opinion.
Please check out this new kid on the Azure IoT block and learn how you can use this ‘IoTGrid’ next to the traditional, mature, Azure IoT Hub.
Update: Check out this free online presentation about the Azure EventGrid MQTT support on January 18th, 2024 about this feature. Free registration is available here. Update: The session is recorded. You can find the recording by following that link.
Bonus: MQTT Audit app
Once you start using the new MQTT broker, you will find out this service feels a bit like a black box.
You want to have control over the messages being published on any topic and you want to investigate the messages being received.
For this purpose, I created this simple app, able to visualize messages received on MQTT topics:

If the message body can be shown as a float, a bar chart is shown. Otherwise, a list box with text strings is shown.
Check out the repo here.

I am able to set up this code and working as expected.
Now instead of MQTTX , I need to push the messages using C# code. I am not able to push the message with Certificates. With normal Mosquitto Broker i am able to push messages without certificates. I am using .Net core and MQTTNet client library for the same. Please help me how to achieve this
Did you try out this https://github.com/Azure-Samples/MqttApplicationSamples/tree/main/mqttclients/dotnet example?
The solution contains only a library as MQTT extension for this ‘IoTGrid’.
You need to create a .net7 console app next to it and reference the library.
Do not forget to add all applicable environment variables first. Restart Visual Studio if needed, after the last variable is saved.